Docker containers from the command line
Who is this article for: For those who are not familiar with Docker. We will figure out what it is, what it can do, and how to use it.
If you are already familiar with Docker and don’t want to dive into details, grab the cheat sheet and a brief overview here:
Today, we will focus only on the topic of launching a container from the command line.
Reading will take about 15 minutes, and reading with practice will take 30–45 minutes. So, if you have about an hour to spare ☕️, let’s delve into such an important modern tool as Docker.
Contents
- 1 What is Docker?
- 1.1 A virtual machine with a set of preconfigured images…
- 1.2 Operations with Containers
- 1.2.1 Launch a Container
- 1.2.2 Interactive/Terminal Access to the Container
- 1.2.3 View the List of Containers
- 1.2.4 Connecting to a Running Container
- 1.2.5 Detach a container from the terminal (run it in the background without interactive mode).
- 1.2.6 Execute a Command Inside a Running Container
- 1.2.7 Delete a Container
- 1.2.8 Logs
- 1.2.9 Operations with images
- 1.3 … with the network…
- 1.4 … with configurable ports that can be “forwarded” (mapped) to the host machine…
- 1.5 … with folders that can be “substituted” by host directories…
- 1.6 … and manage application settings through environment variables.
- 2 Docker Commands Cheat Sheet
- 3 Why might Docker be needed?
What is Docker?
In short, it’s an engine for running “virtual machines” (like VMware/VirtualBox).
To be precise 👨🏫:
It doesn’t actually emulate hardware like VMware or VirtualBox, so it’s not technically a “virtual machine.” However, I’ll call it that in the text to give you a better idea of what it resembles.
A Docker container is more like a separate sandbox within your system, where a server, application, or tool can run without interfering with other processes.
It’s not typically used to run full operating systems or applications with a UI (though it’s probably possible—I haven’t tried). However, it’s perfect for running servers and various preconfigured development systems for Linux, especially if you need multiple servers that are lightweight and isolated.
Let’s start with the installation.
Installation:
The installation process is detailed on the official website. Install Docker Desktop for your system (Mac, Windows, or Linux). In the simplest case, you just need to download the installer and run it. Verify that it’s running in the background and working by launching a simple container:
docker run -it --rm alpineYou will see a Linux command prompt. Everything works! You have launched a virtual machine with Alpine Linux (a very lightweight version of Linux, only 3.48 MB compressed). Based on Alpine, you can build various servers and network services or use it as a Linux workstation. If you want to install something in this virtual machine, use apk.
apk install <package>When you’re done experimenting with Alpine Linux, type exit. Everything installed inside will be lost (though this behavior can be changed).
Now that everything is set up, let’s take a closer look at what Docker actually is. It is:
A virtual machine with a set of preconfigured images…
When a virtual machine (container) is created, an operating system with a pre-installed set of programs (image) is installed (restored). An image is something like a backup of a preconfigured system.
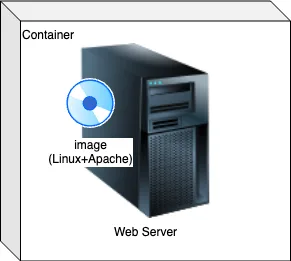
There is an entire catalog of images on hub.docker.com, where you can find almost anything, often provided directly by the developers of the systems themselves. You can also create your own image by using a ready-made one or a clean operating system (like Alpine) as a base and installing your applications. This preconfigured “snapshot” of the system can be saved to your repository on hub.docker.com as a new image. If it’s made public, it’s even free of charge.
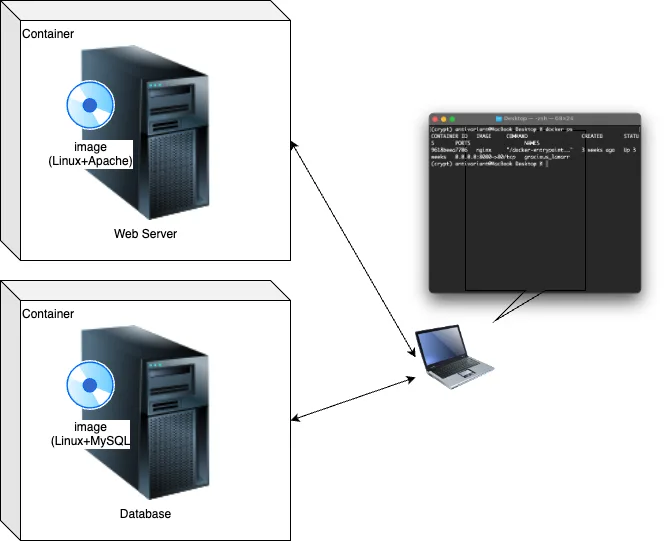
Operations with Containers
Try all these operations with the Alpine image. Launch it in one terminal window and perform the operations in another:
docker run -it --rm alpineAlmost all commands follow this format:
docker(it’s given a command), then the command itself (run,exec,attach,ps, and others), followed by the flags that refine the command’s behavior, and finally the image or the command to execute inside the container.A command can be “two-tiered” (i.e., two commands + flags) if we’re not addressing a container directly (e.g.,
docker image <command> <flags>ordocker network <command> <flags>). This is because we work with containers 90% of the time, so to simplify things,docker containeris omitted, and we just write what to do with the container (e.g.,docker ps,docker rm).
Launch a Container
docker run .... <image>run is a Docker command that starts a container.
Interactive/Terminal Access to the Container
You can connect to the virtual machine (container) via a terminal, execute commands, and install or remove programs—just as if you were connecting to a server via SSH.
docker ... -it ...The -it flag makes the container send its stdout to the terminal it was launched from (-i flag), even if the -t flag isn’t specified, and enables pseudo-terminal input (tty, -t flag). These flags are usually used together as -it (you can remember it as “Inter-acTive” or “Interactive Terminal”).
View the List of Containers
docker ps -aThe ps command is easy to remember for those who have worked with Linux. There, it means “show the list of processes running in the background.”
The -a flag will display everything, including stopped containers:

The most important fields are image (the container’s image), container_id, and names (the container’s identifiers).
Wherever you need to specify a container, you can use either its
container_idorname. If you don’t explicitly assign a name to the container at launch (docker run --name <name>), Docker will generate one automatically (and sometimes they turn out to be quite funny). In this case, you can view the name using thedocker pscommand.
Connecting to a Running Container
In addition to starting a container (run), you can connect to an already running container (attach).
docker attach .... <container_id_or_name>Detach a container from the terminal (run it in the background without interactive mode).
To make the container “detach” from the terminal it was launched in, use the -d (detach) flag when starting the container.
Try running a container with the -d flag and without it:
docker run -d -p 8080:80 -v ./:/usr/share/nginx/html/ nginxIf you don’t use the -d flag, the terminal will continuously display logs after the container starts (this is how the image is configured).
Execute a Command Inside a Running Container
docker exec <container_id_or_name> <command>The container must be running (check this with docker ps, and at the same time, note the container’s name or ID). This is one of the most commonly used commands.
As an example, execute some commands in the Alpine container we launched earlier. Try something simple like:
ls– (list files)cat <file>– (display the contents of a file from thelsoutput)
The command can also be a shell (e.g., bash, sh). This allows you to return to “interactive” mode and work inside the container.
Delete a Container
docker rm <container_id_or_name> You can only delete a stopped container (not just detached with -d, but fully stopped).
Logs
You can also view logs inside the container.
docker logs <container_id_or_name> You can view logs for a specific time period. The time is specified in quotes and can be either relative (in minutes—"10m", hours—"10h", days—"10d") or absolute in ISO format (yyyy-mm-ddThh:mm:ssZ, in UTC+0).
- From the start until a specified time:
--until "time" - From a specified time until the end:
--since "time"
Operations with images
In addition to containers, we need to manage images as well. This is done using a “two-tiered command.”
docker image <command>To view their list
of locally downloaded images. If we need to create another container, Docker first looks for the image in the locally downloaded images, and if it doesn’t find it, it pulls it from hub.docker.com.
docker image lsThe -a (or --all) option will show all.
Remove
docker image rm <image_name>You can only delete images that are not being used by containers.
You can remove all unused images with the prune command.
The -a (or --all) flag is used to remove all unused images, not just those without tags, while the -f (or --force) flag removes them without asking for confirmation.
docker prune -a -f… with the network…
Each container has its own IP address, as if it were a real computer connected to your machine via a local network.
You can start multiple containers and connect them to a network. You can even create several networks, essentially setting up “virtual routers”. To do this, you can use the --network=<router_name> flag (where “router” is the name of the network/virtual router, such as my_network or int_network).
docker ... --network=<router_name> ...But beforehand, you need to create this “router.”
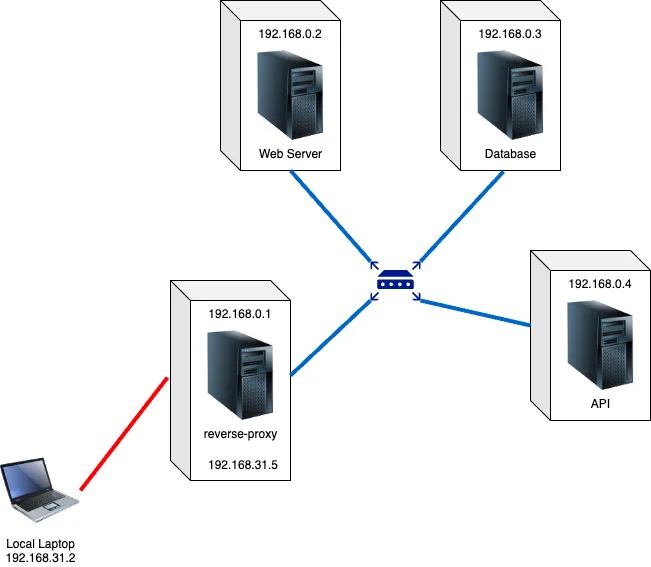
docker network create <router_name>The network can be quite simple (you don’t even need to configure it, Docker will handle everything automatically, but the containers won’t be able to communicate with each other by name).
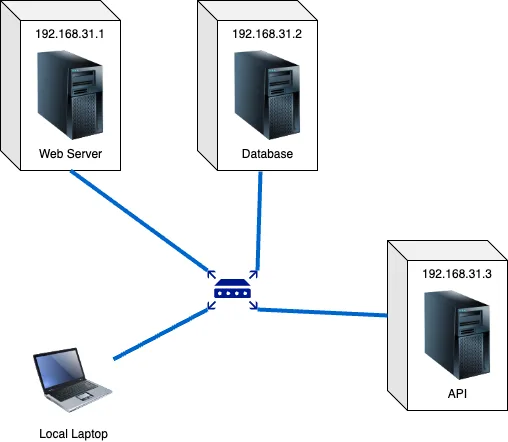
It can also be more complex, for example, with a reverse proxy server (I’ll tell you about this sometime later).
Inside the container, your internet is accessible, so you can install programs directly using commands like apt-get install (for Debian), apk add (for Alpine), and so on.
… with configurable ports that can be “forwarded” (mapped) to the host machine…
Some applications inside the container “listen” for requests on specific ports (such as web servers, databases, FTP, mail servers, etc.). To access this “internal” port from the outside world, the container must also listen for and accept incoming requests from the external world and forward them to the internal container.
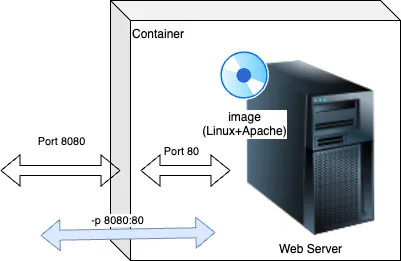
Moreover, it can listen on one port externally and forward it to a different internal port. This is called “port forwarding.”
This parameter is specified using the -p flag, where the external port is always specified first.
In general, for all flags where you need to specify “forwarding” between the container and the “outside world”/local computer, the format is always outside:inside (the container).
docker ... -p <outside>:<inside_container>Port forwarding is often required because:
- First, without explicit port forwarding, the container won’t be able to communicate with the outside world.
- Second, containers typically run on standard ports (like a web server on port 80, MySQL on port 3306). But what if these ports are already occupied? You can forward them to any other available port!
If you want a service inside the container to listen on a port (but this wasn’t configured in the original image), you need to specify which ports the container provides/opens when starting it. This is done using the --expose flag followed by the port number.
docker run -it --expose 80 -p 80:80 <image>Note that --expose is not enough. This only opens the port inside the container, but you still need to forward it so that it listens on the port “outside” and forwards it “inside.”
… with folders that can be “substituted” by host directories…
Another “trick” you can do with containers is to mount a host folder to the container (in the case of virtual machines, the “host” is your physical computer). The container will see this folder as its own.
And just like with ports, the folder on the host can have one path and name, while inside the container, it can be different. For example, on the host, it might be the folder /home/me/Documents/myproj, while inside the container, it could be /usr/share/nginx/html (this is where nginx usually stores the web page files).

And it’s important! The folder will not be copied into the container; by simply opening its
/var/wwwfolder, the container will actually see the contents of the folder on the host.
This is done using the -v flag in the format: outside_path:inside_path (container’s path).
docker ... -v <outside>:<inside_container>… and manage application settings through environment variables.
There is one remaining question: if an image is already a pre-installed and configured system, how can it be customized? How can you pass in the admin password or database name? The answer is simple — through system variables (environment variables).
If you don’t know what system variables are, make sure to join my course Manual QA (it’s already available) or SDET:Base (but if you’re not familiar with system variables, it’s better to start with Manual QA).
docker .... -e <variable>=<value>To find out which system variables are supported, read the description of the image on hub.docker.com.
Docker Commands Cheat Sheet
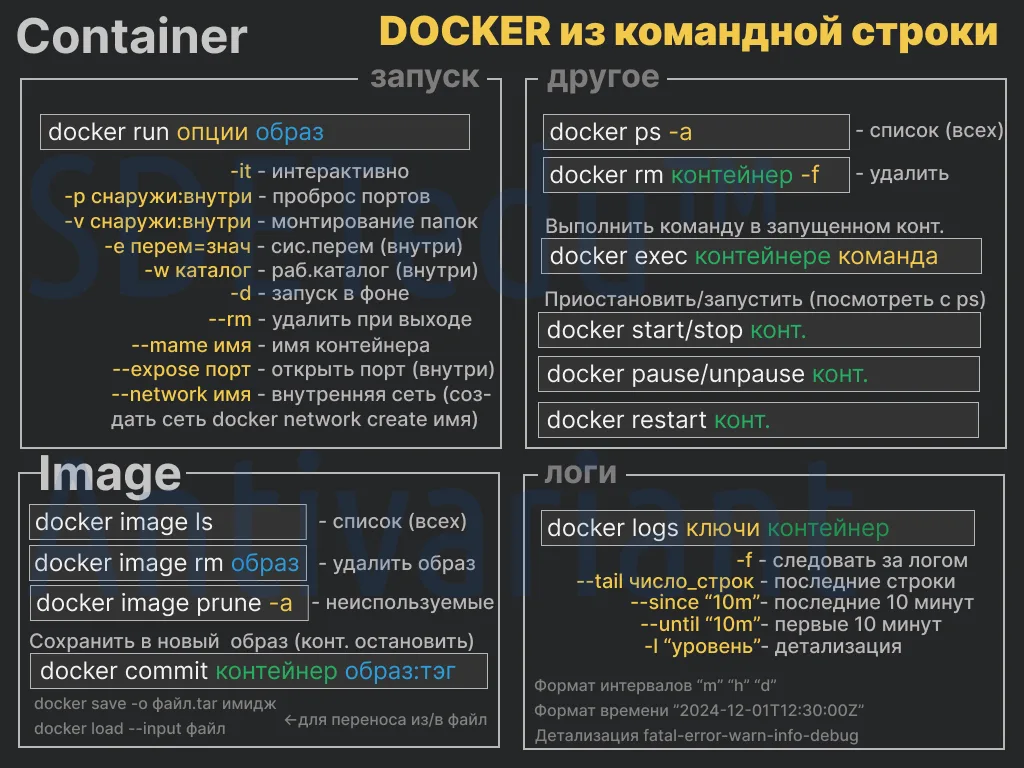
Yes, this is a small “cheat sheet” for the most important commands. In general, Docker has very convenient help. You can simply type docker --help to get a list of commands.
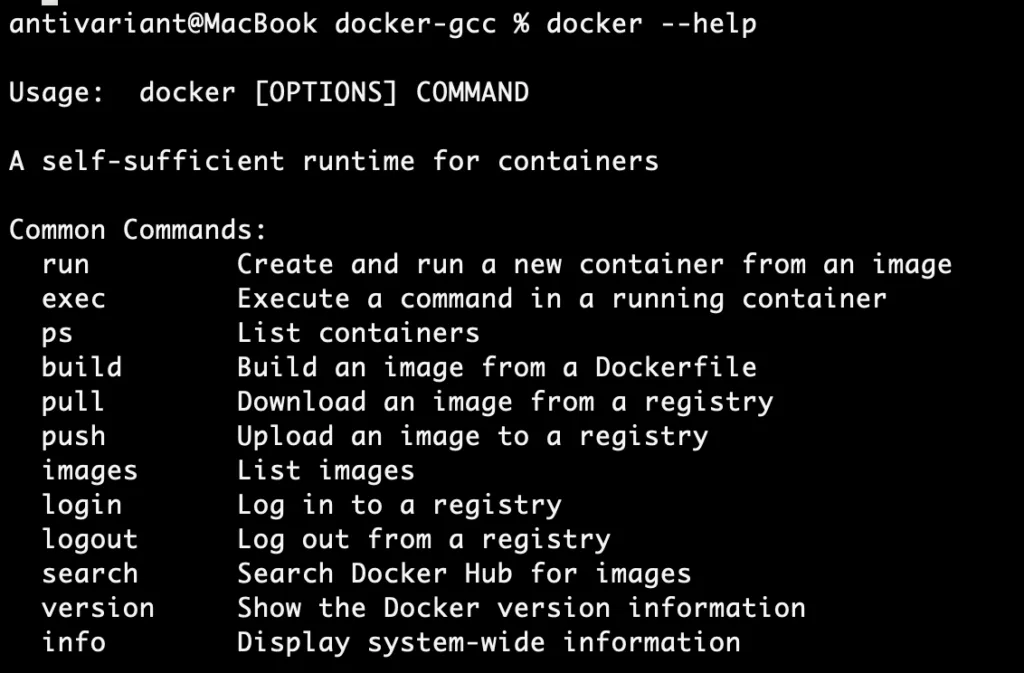
By typing docker <command> --help, you get a list of options (flags) and usage details for that specific command. For example:
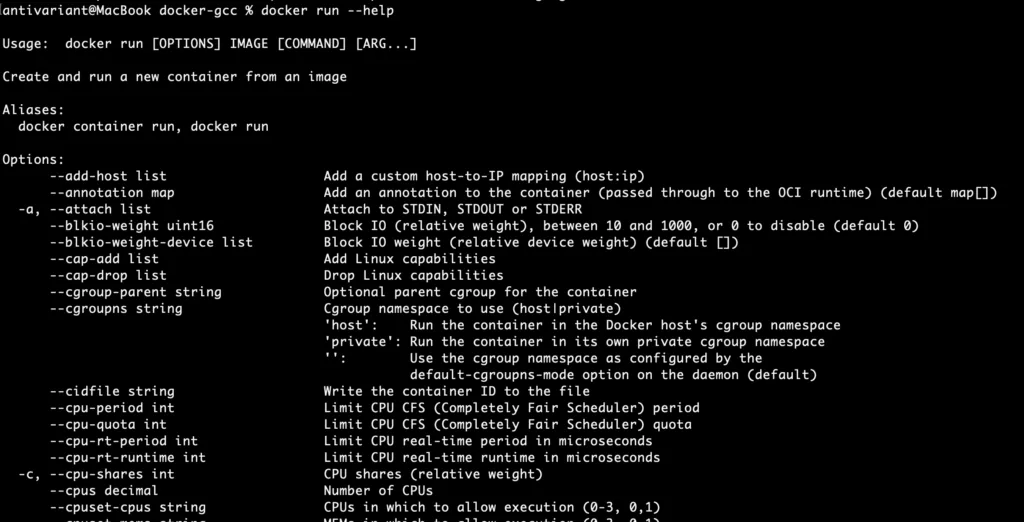
Exactly, you will get a list of dozens of keys, many of which you might never use. I’ve selected the most important ones for you.
This approach helps focus on the essential commands and options that are commonly needed while working with Docker.
Why might Docker be needed?
Here are some real-life examples:
Lightweight (how to run multiple containers)
For the GetManualQA course, I needed to set up 7 servers for student “experiments.” Of course, I could have run them on my favorite VMWare, but running 7 operating systems on 7 virtual machines at the same time would have been very heavy. Instead, I developed them locally using Docker, and they kept running on my MacBook M1 (even though the course has been over for almost a year). I only recently remembered them and stopped the containers…
To launch 7 virtual servers, you could simply start them individually. However, I used Docker Compose, but I’ll talk about it another time (and we cover it in the Manual QA course as well).
Isolation (running a web server from the current folder)
I’m writing the frontend (Vue.js/TypeScript/Quasar/Vite). On the production web server, the code will already be built (converted into JavaScript), minified (without line breaks and spaces), and transformed into the required version of JavaScript for compatibility with all browsers (using Babel). This is how modern frontends work: your code, written in any language, is transformed into HTML + JS + CSS and deployed as static files on the server, while interactive content is fetched via API requests from JavaScript on the client side and HTML (DOM) is updated, also on the client side (we even cover this in the Manual QA course, feel free to join). Now, the code that resides on the server is actually a completely different version. Sometimes, the code works locally, but doesn’t on production.
I faced this issue myself — on the frontend deployed on production, system variables were not visible. This is actually normal, because, as I mentioned earlier, the frontend is a set of static files and JavaScript, which the user essentially downloads and runs locally via the browser. Therefore, the user sees the system variables of their own local machine, not the server’s. Vite solves this problem, but it needs to be configured correctly (I’ll explain how in a separate post, that’s not the topic here).
At the time, I was just learning Vue3+Quasar and needed to simulate how the frontend would work in a production-like environment (i.e., on an isolated system away from my development environment) to understand how it works. I needed to do this once, just to figure things out, and preferably have the ability to quickly rebuild and deploy the project. I didn’t want to set up local servers or use VMWare/VirtualBox/UTM and then copy the static files there (it’s time-consuming), and uploading it for testing to the live server wasn’t an option either. Of course, I could have used LiveServer in VSCode, but that would require configuring, then changing the settings back. Moreover, it wouldn’t be an isolated server without my system variables.
With Docker, everything can be solved with a single command line: the current folder becomes the root for an Nginx web server (/usr/share/nginx/html/), which immediately becomes available externally. And it’s completely isolated and mirrors exactly how it will be on the real production server!
Here’s the command:
docker run --name test -it -p 8080:80 -v ./:/usr/share/nginx/html/ --rm nginxI go to the dist folder (where the build is placed) on my local machine and run this command. It automatically loads Nginx, deploys it in a container, replaces the folder where the webpage files should be stored with my current dist folder, starts Nginx inside the container, which begins listening on port 80, while the container starts listening on port 8080. Now, I can access it via http://127.0.0.1:8080, and my built project will open! Completely isolated and exactly how it will be on the production server!
Code Compilation When No Compiler is Installed
C++ Code Compilation for Linux
Let’s imagine that you don’t often program in C++, and you don’t have any compilers installed, but a very necessary utility is provided in source code form. How can you solve this issue without installing a compiler?
Create a file called comp or comp.bat with the following command line:
docker run --rm -v ./:/usr/src/test/ -w /usr/src/test/ gcc c++ $*- run — creates and “runs” the container.
- –rm — removes the container after execution (each run will create a container, execute the command, and then remove the container). Note that the image will only be pulled the first time.
- -v — mounts the current folder into the container’s
/usr/src/test.gccfolder — the name of the image. - c++ $* — the C++ command line and the parameters passed to the script (
$represents parameters,$0is the command itself,$1is the first parameter…$*represents all parameters). - $* — passing parameters to the script.
For Linux and macOS, give execute permissions.
chmod +x compand use it as a compiler (keep in mind that it’s being compiled for Linux, so the resulting file will be in the Linux format).
./comp test.cpp -o test.oIn the end, we’ll get the following command inside the container:
c++ test.cpp -o test.oand the result (test.o) in the current folder.
C++ Code Compilation for Windows (MinGW)
Another example — C++ code compilation for Windows (MinGW).
It’s the same, but using the mdashnet/mingw image (if it’s no longer available, you can search for an image on hub.docker.com by the keyword “mingw”). For convenience, we create a script to run the compiler (e.g., comp1).
docker run --rm -v ./:/usr/src/test -w /usr/src/test mdashnet/mingw x86_64-w64-mingw32-g++ $*The only thing worth commenting on here is x86_64-w64-mingw32-g++. This is the MinGW compilation command line.
The command to run will look like this:
./comp1 test.cpp -o test.exeIn general, one of the algorithms for using Docker for compilation:
- Mount the current folder to some folder inside the container (using the
-vflag, with the format outside:inside). - Set the mounted folder inside the container as the working directory (using the
-wflag followed by the folder path inside). - Execute
docker runwith the image, command, and parameters (use--rm, otherwise each compilation will leave a copy of the container).
docker run --rm -v <path_outside>:<path_inside> -w <path_inside> <image> <command> <command_params>Using exec Instead of run
As an option, you can run docker run the first time, and then use docker exec (in this case, you need to remove --rm, and for the second and subsequent runs, -v and -w are not needed, but you must provide a container name)..
The first time
docker run --name <cont_name> -v <path_outside>:<path_inside> -w <path_inside> <image> <command> <command_params>The second and subsequent times
docker exec <cont_name> <command> <command_params>In this case, the first time we create the container and can execute a command inside it (if no command needs to be executed, remove “command” and “parameters”). For the second and subsequent times, we connect to the created container and execute a command inside it.
This option is neither better nor worse than the first, as the folder with the working files remains on the local computer in both cases. In both the first and second cases, the image is pulled only the first time it is run.
Working Directly in the Container
Another method (which I think is the best) is to work directly in the container. All you need to do is add the -it flag to the docker run option and remove the command with the parameters (in some cases, you need to specify the shell binary as the command: bash, sh, or /bin/bash).
docker run -it --rm -v <path_outside>:<path_inside> -w <path_inside> <image>After that, navigate to the folder <path_inside>.
cd <path_inside>And then execute commands there.
The advantage of this method: you can run and test the compiled file inside the container, as well as debug it (by compiling with the -g flag and using gdb).
Security Testing (Pentesting)
Web Testing
We run a specially created test website (with numerous security vulnerabilities).
docker run --name buggy_web -p 3000:3000 bkimminich/juice-shopOpen in the browser http://localhost:3000 and we can refine our skills and test against OWASP.
Server Vulnerability Testing
Here, Docker’s ability to run images with any server version is very handy. To do this, after specifying the image, you add the version after a colon.
For example, we are testing the security of a real server, and it is running a specific version of SAMBA. We can install that version.
To ensure that both the “victim” and the “attacker” are in the same isolated network, we will create one.
docker network create sm_netAnd now, we will run the container with the required image in this network.
docker run -it --rm --name smb_victim --network sm_net -p 445:445 -v ./:/storage -e "USER=samba" -e "PASS=secret" dockurr/samba:4.18.10Here, we launched the container in interactive mode (-it), it will be removed after exit (--rm), we named the container smb_victim (--name), connected it to the sm_net network (--network), forwarded port 445 (-p), mounted the current folder (from which the command is executed) to the path /storage (-v), and passed configuration settings through environment variables (the image is configured this way; you can check the environment variables and mount paths in the documentation on hub.docker.com by searching for the dockurr/samba image). The settings are: user — samba, password — secret, shared folder — Data.
Now, you can safely check for SAMBA vulnerabilities locally, rather than directly on the live website.
The required server version is not always available, but you can create your own image. How to do this will be covered in a separate article about creating images.
Additionally, we might find an image with pre-installed security testing tools useful. For example, without stopping SAMBA, you can run it in another terminal and in the same network:
docker run -it --rm -p 4444:4444 --network sm_net metasploitframework/metasploit-frameworkAdditionally, we might need the ever-popular Kali Linux with basic functions and the ability to install everything necessary. We run it in a third terminal and in the same network.
docker run -it --rm --network sm_net kalilinux/kali-rollingIn it, let’s install the necessary tools for testing SAMBA.
We’ll update the package list (Kali Linux will run as root by default, so there’s no need to use sudo).
apt-get updateLet’s install a convenient program for managing utilities on Kali Linux.
apt-get install kali-tweaksWe will launch it, select the “Kali’s top 10 tools” metapackage (or whichever one you need), and install it.
kali-tweaksYou might also need a specific utility, such as Samba Client (smbclient).
apt-get install smbclientAnd let’s try to connect to the Samba container. Using the user samba with the password secret, to the shared folder Data (we configured this when starting the Samba container).
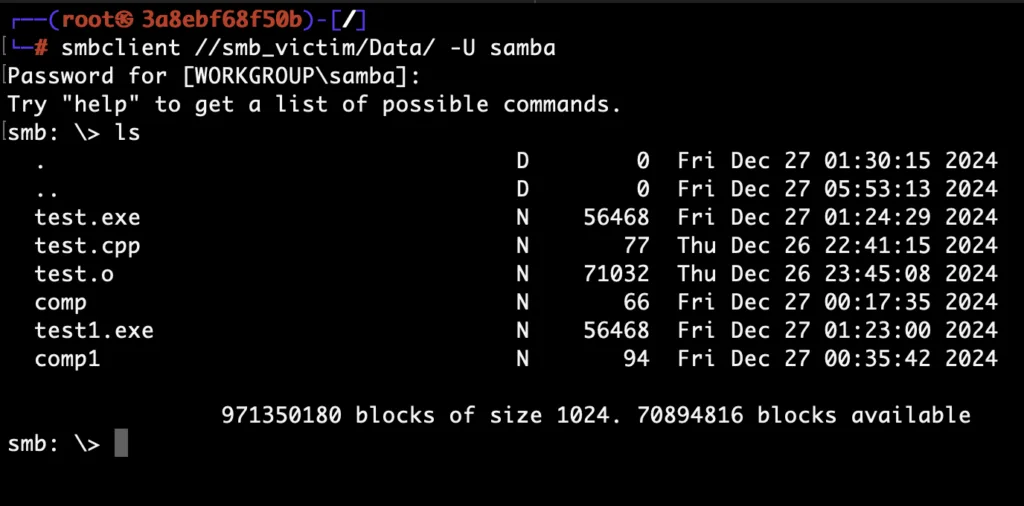
Great! Samba is working, and now you can test it for security.
How to do this — stay tuned for one of the upcoming posts and follow the SDETedu™ project (qacedu.com), where I’m preparing equally clear and straightforward courses on various topics of testing (from manual testing to UI automation, unit testing, CI/CD testing, performance testing, and security testing).
While it’s still under development, there is already a ready-made manual testing course that I’m currently conducting. You can find the course details on qacedu.com. The main difference in my courses is that I teach based on results, not time. We will cover the topic until you fully understand it, and you won’t have to pay extra time like you would with a tutor.
